

In today's world of digital offices and content creation, MP4 has become the "universal currency" of video formats due to its excellent compression ratio and near-perfect compatibility. Whether you are uploading to social media or trying to play a file seamlessly across different devices, mastering the skill to convert video to mp4 is essential.
This article will introduce you to several top-tier conversion tools and teach you how to complete the operation with ease. Using a reliable video converter can save you time and ensure your content looks professional on every screen.
Why You Should Convert Video to MP4?
The MP4 (MPEG-4 Part 14) format is the industry standard for a reason. Here are the primary reasons why you should prioritize this format:
-
Universal Compatibility: From iPhones and Androids to Smart TVs and gaming consoles, MP4 plays everywhere without needing extra codecs.
-
Small File Size, High Quality: It offers a great balance between file size and visual fidelity, making it perfect for web sharing.
-
Platform Requirements: Social media giants like Instagram, TikTok, and YouTube recommend MP4 for the smoothest upload process.
-
Streaming Support: MP4 is optimized for streaming over the internet, preventing buffering issues.
Best Tools to Get the Job Done
Finding the right tool depends on your specific needs, such as speed, file size, or advanced editing features.
1. Snappixify — The Fast and Smart Online Choice
If you are looking for a solution that requires no software installation and balances efficiency with quality, Snappixify is one of the most recommended tools on the market today.
As a powerful online video downloader and converter, Snappixify is an intelligent media processing tool designed for modern creators. It offers unparalleled compatibility, allowing users to convert to 500+ videos and audio formats (such as AVI, MOV, MKV, FLV, and more) into standard MP4. Furthermore, Snappixify is an all-in-one download assistant. It enables users to directly fetch and convert videos from major social platforms.
Core Advantages:
-
Zero Installation Cost: Access it directly through your browser; it works perfectly on Windows, Mac, and mobile devices.
-
Batch Processing: You can upload multiple videos simultaneously, saving significant time on repetitive tasks.
-
Lossless Quality Optimization: During the transcoding process, the algorithm retains the original video's bitrate and color depth.
-
Rich Presets: It provides specific export presets for TikTok, Instagram, and YouTube, automatically adjusting to the best resolution.
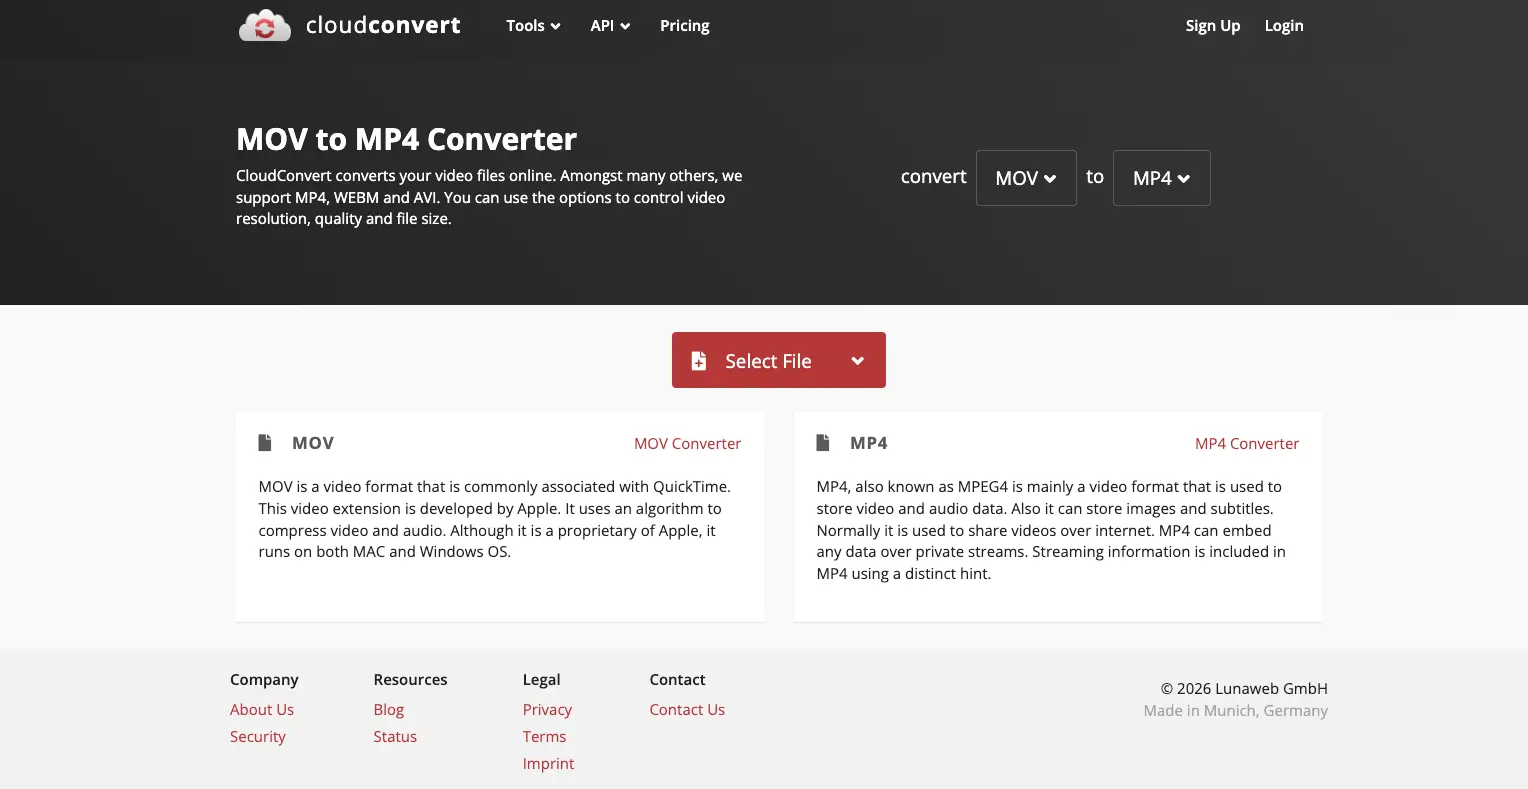
2. CloudConvert
CloudConvert is a versatile "anything-to-anything" file converter that supports over 200 formats. It is widely used for various file types.
-
Compatibility: Web browser
-
Pros: Offers an ad-free user experience; supports direct imports from URLs, Google Drive, and Dropbox; allows for batch conversion of multiple files.
-
Cons: Requires user registration for certain features; conversion speed can vary depending on server load; daily usage limits are strictly enforced on free accounts; lacks built-in video editing features.
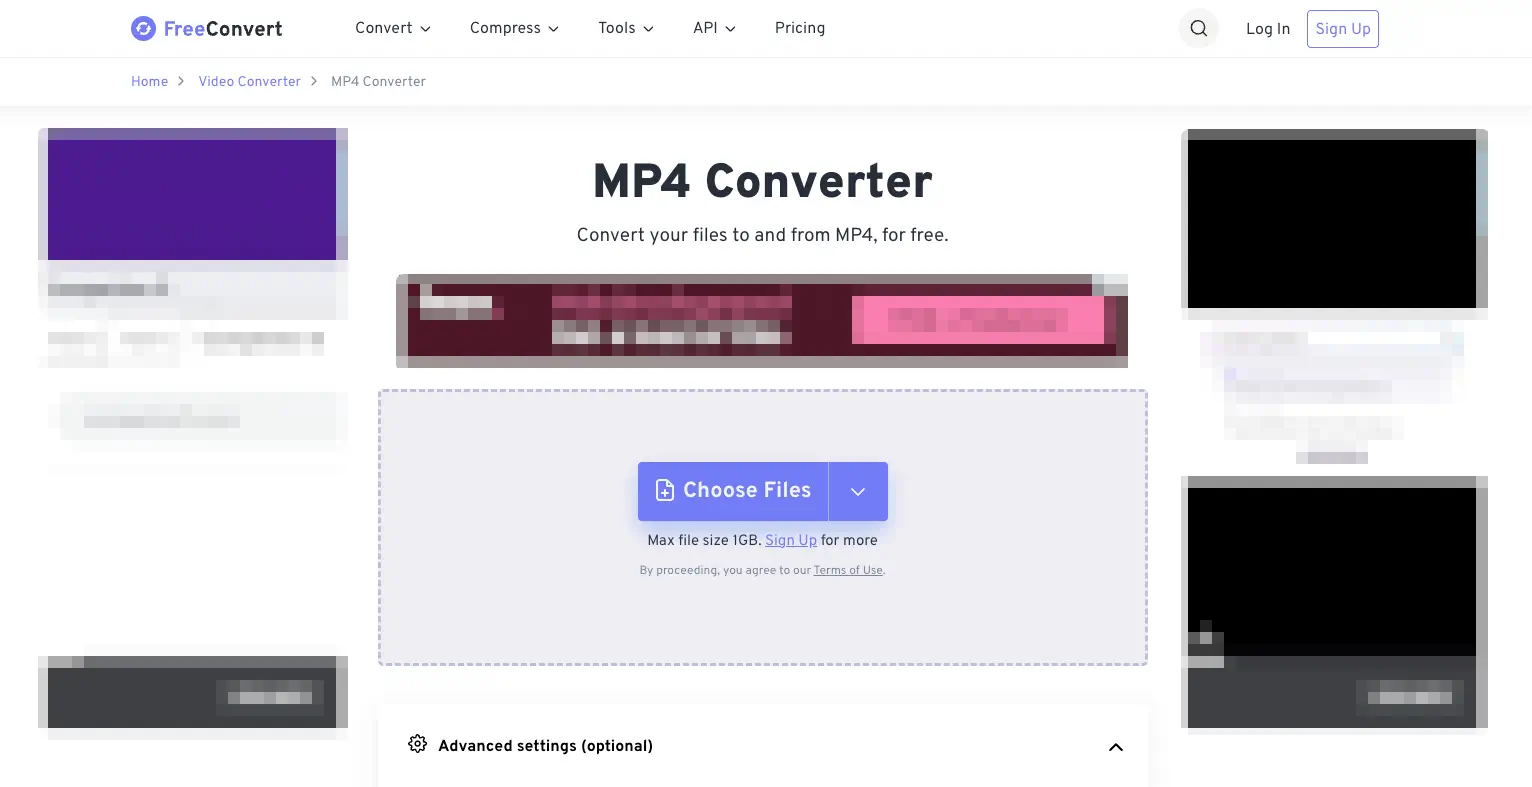
3. FreeConvert
FreeConvert is an easy-to-use web-based tool that allows for large file uploads compared to many other online competitors.
-
Pros: Supports files up to 1GB for free users; provides basic "Advanced Options" for adjusting codecs.
-
Cons: The interface is heavily cluttered with advertisements.
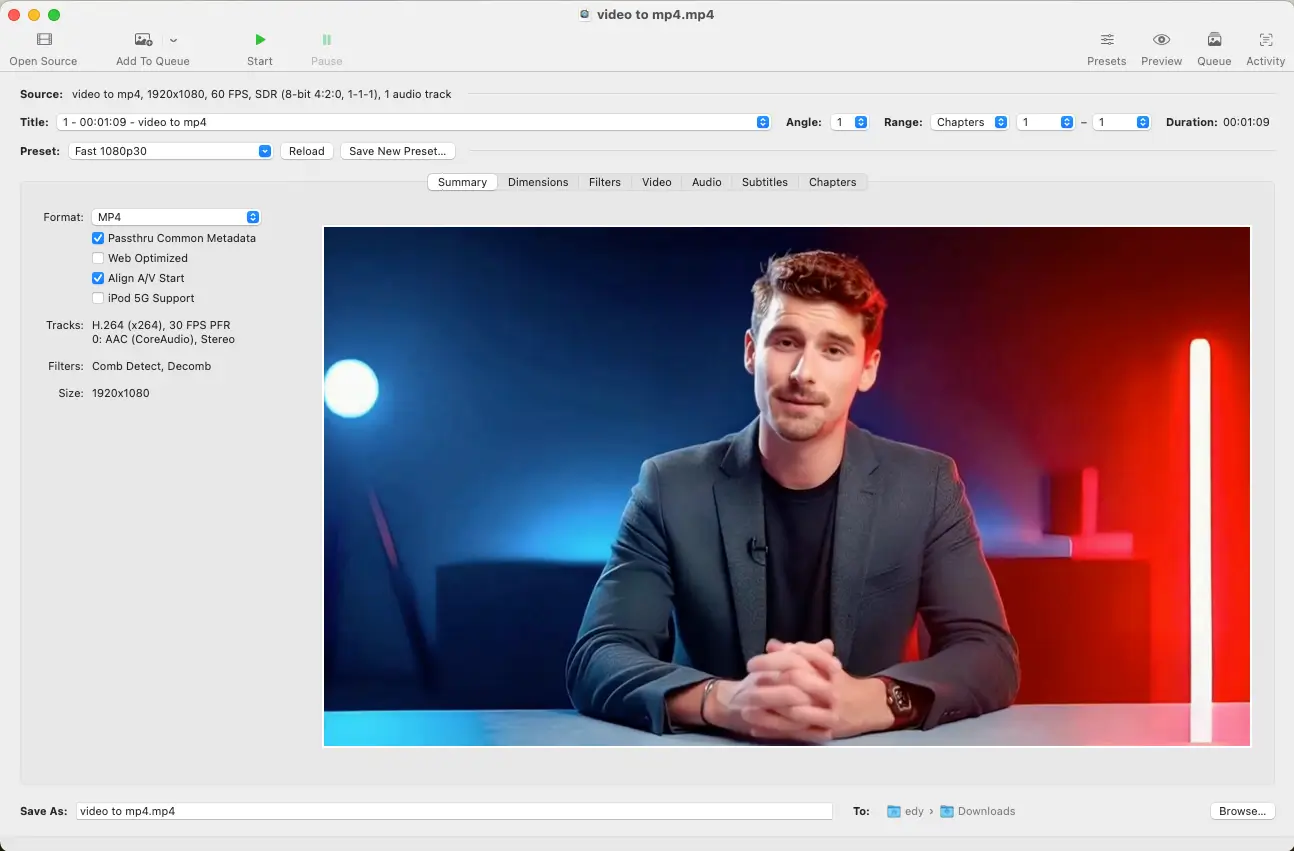
4. Desktop Software Options - HandBrake (Best Open Source Option)
For users who prefer a desktop application for heavy-duty tasks, HandBrake is the gold standard for open-source transcoding.
-
Pros: Completely free with no watermarks; offers deep control over framerates and encoders.
-
Cons: The interface is complex and has a steep learning curve for non-technical users. Crucially, HandBrake is a desktop-only software (Windows, Mac, Linux) and requires local installation. There is no official mobile app, meaning you cannot use it directly on your iPhone or Android device.
How to Choose the Right Tool for You?
Not all users have the same requirements. Depending on your technical skills, the device you are using, and the source of your video, one tool might be significantly better than the others. Here is how to choose based on your profile:
-
The Social Media Creator: If you frequently need to grab videos from YouTube, TikTok, or Instagram and turn them into high-quality MP4s for your own projects, Snappixify is your best bet. It is designed for speed and requires no technical setup.
-
The Office Professional: If you work with various file types like PDFs, documents, and small video clips, and you use Google Drive or Dropbox, CloudConvert is a great choice due to its seamless cloud integration and clean, ad-free interface.
-
The High-Resolution User: If you have a large 4K video file (up to 1GB) that needs a quick format change without paying for a subscription, FreeConvert is the most generous online option available.
-
The Pro Video Editor: If you are working on a PC, have dozens of files to batch process, and need absolute control over bitrates and codecs, HandBrake is the industry standard—provided you don't mind the installation and the learning curve.
Comparison of Top MP4 Converters
|
Tool |
Type |
Max File Size (Free) |
Best For |
|
Snappixify |
Online |
High/Generous |
Speed & Ease of Use |
|
CloudConvert |
Online |
1GB |
Cloud Integration |
|
FreeConvert |
Online |
1GB |
Occasional Large Files |
|
HandBrake |
Software |
Unlimited |
Professional Settings |
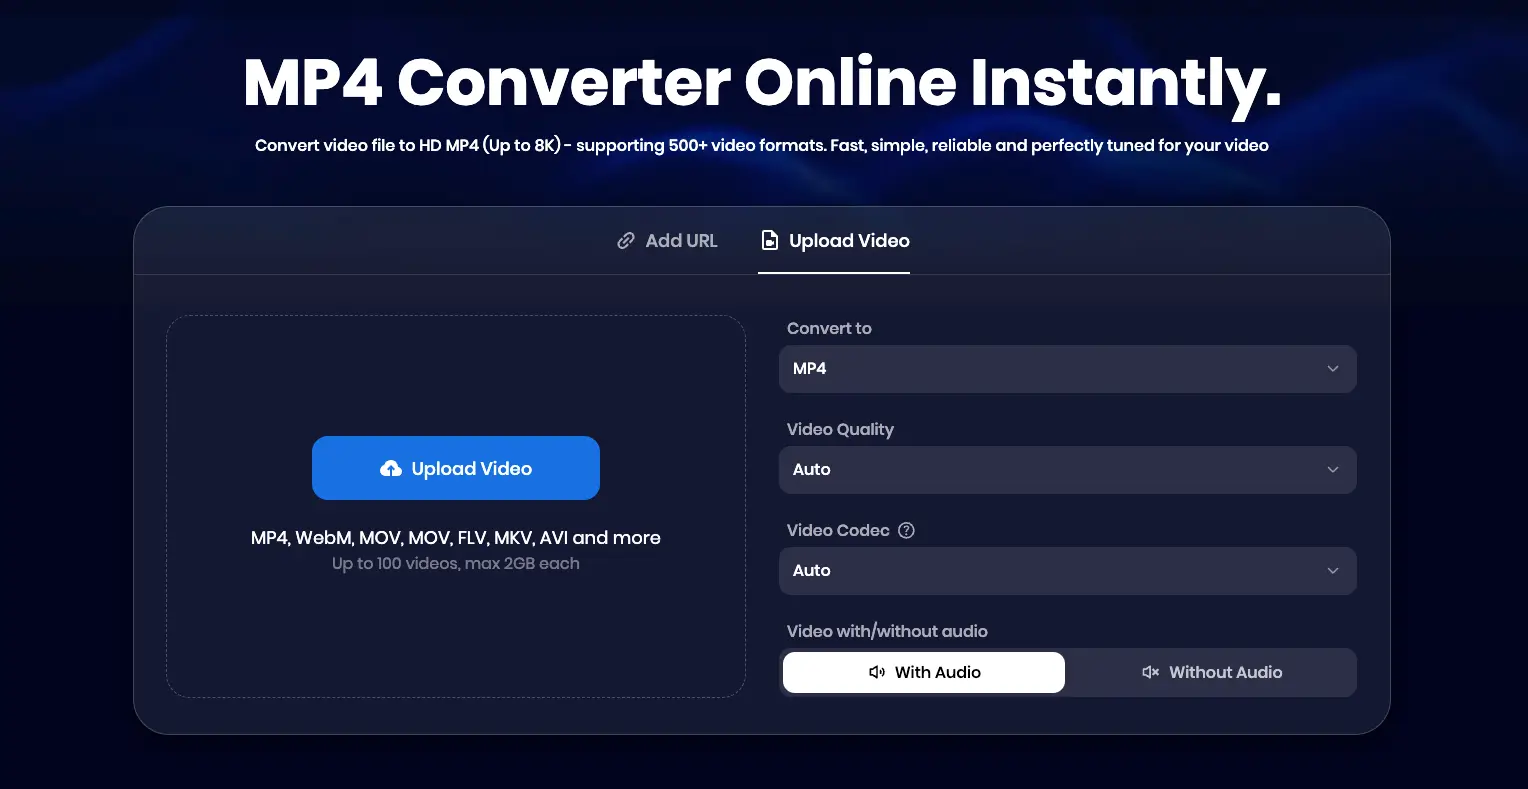
How to Convert Video Using Snappixify
Snappixify offers a streamlined workflow that allows you to configure your output settings before you even start your upload. Follow these simple steps to convert your media:
-
Select Output Format: Start by navigating to the format selection menu and choosing MP4.
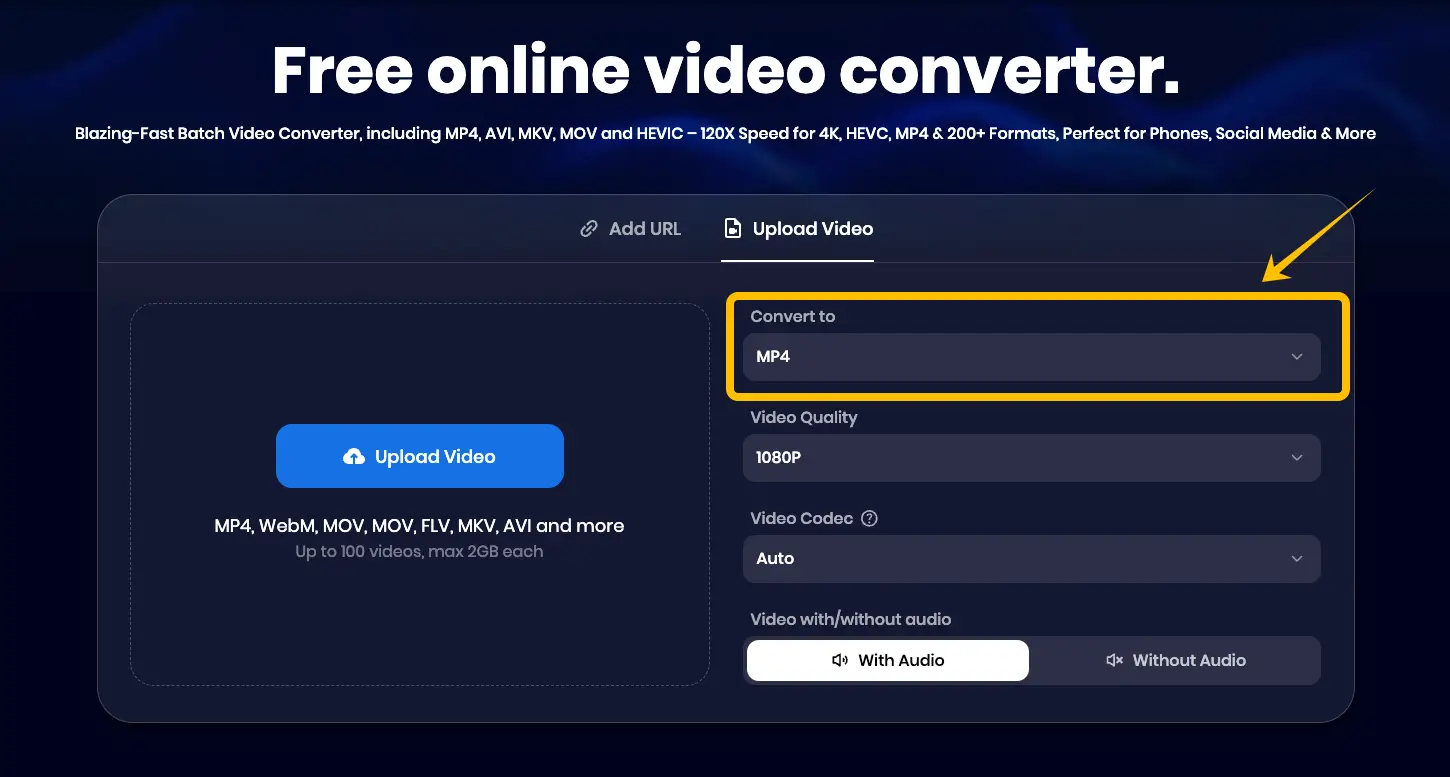
-
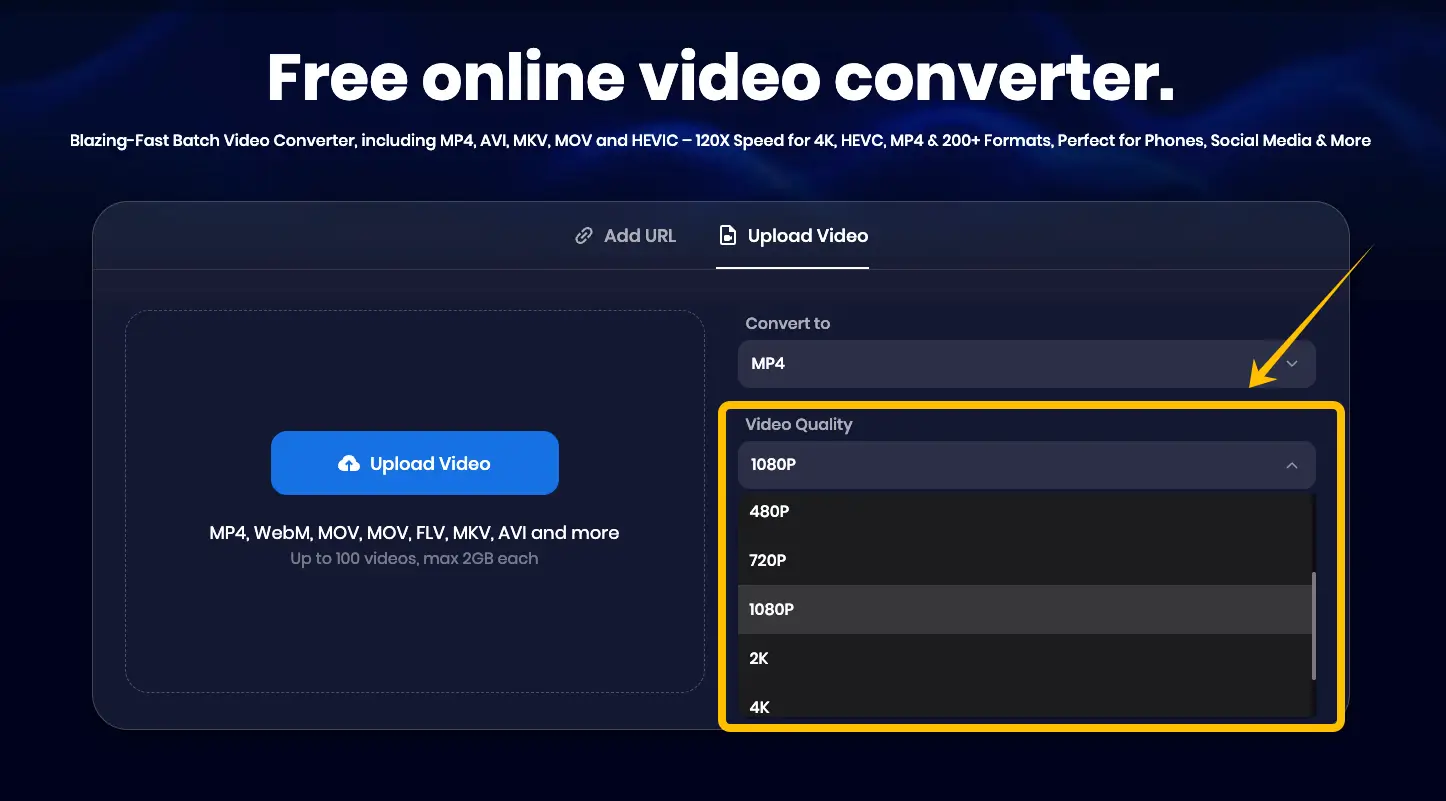
Set Video Quality: Choose your desired resolution. For the best balance between file size and clarity, 1080p is highly recommended.
-
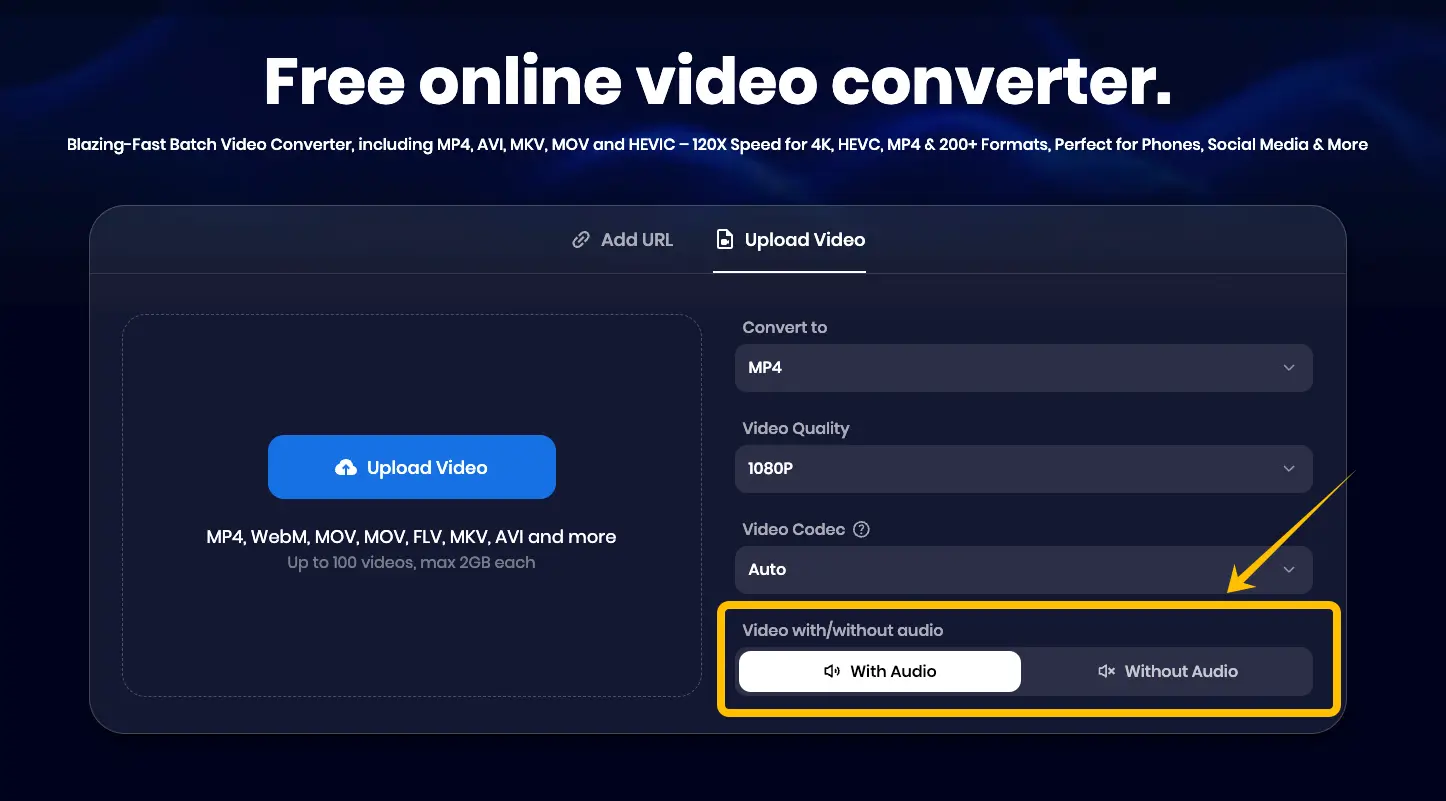
Choose Video Codec: Select your preferred codec. If you are unsure, selecting Auto will allow the AI to choose the most compatible option for your device.

-
Audio Preferences: Decide whether you want to keep the sound or mute the clip by selecting With Audio or Without Audio.
-
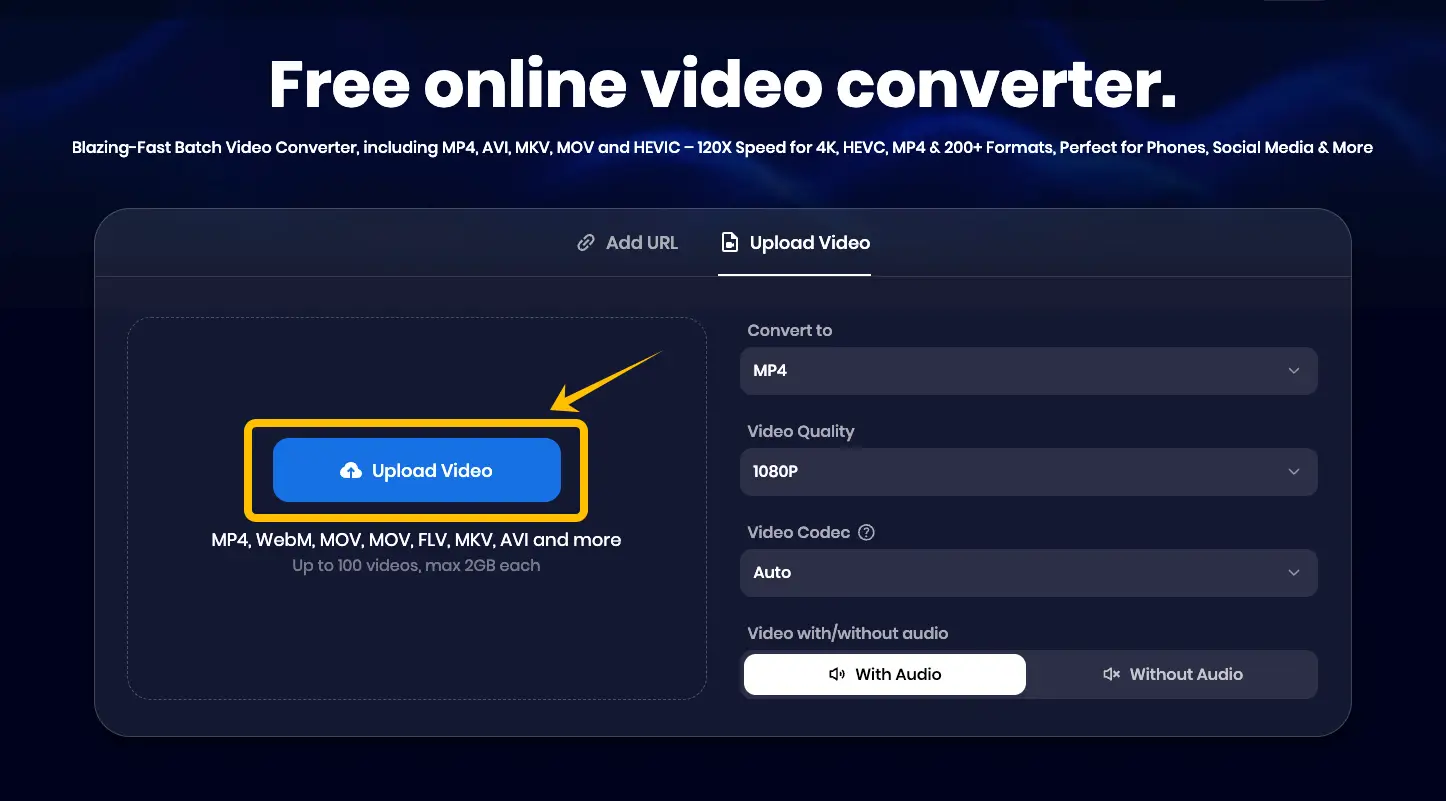
Upload Your Files: Click the Upload Video button to select files from your device. Snappixify supports Batch Upload, so feel free to select multiple videos at once to save time.
-
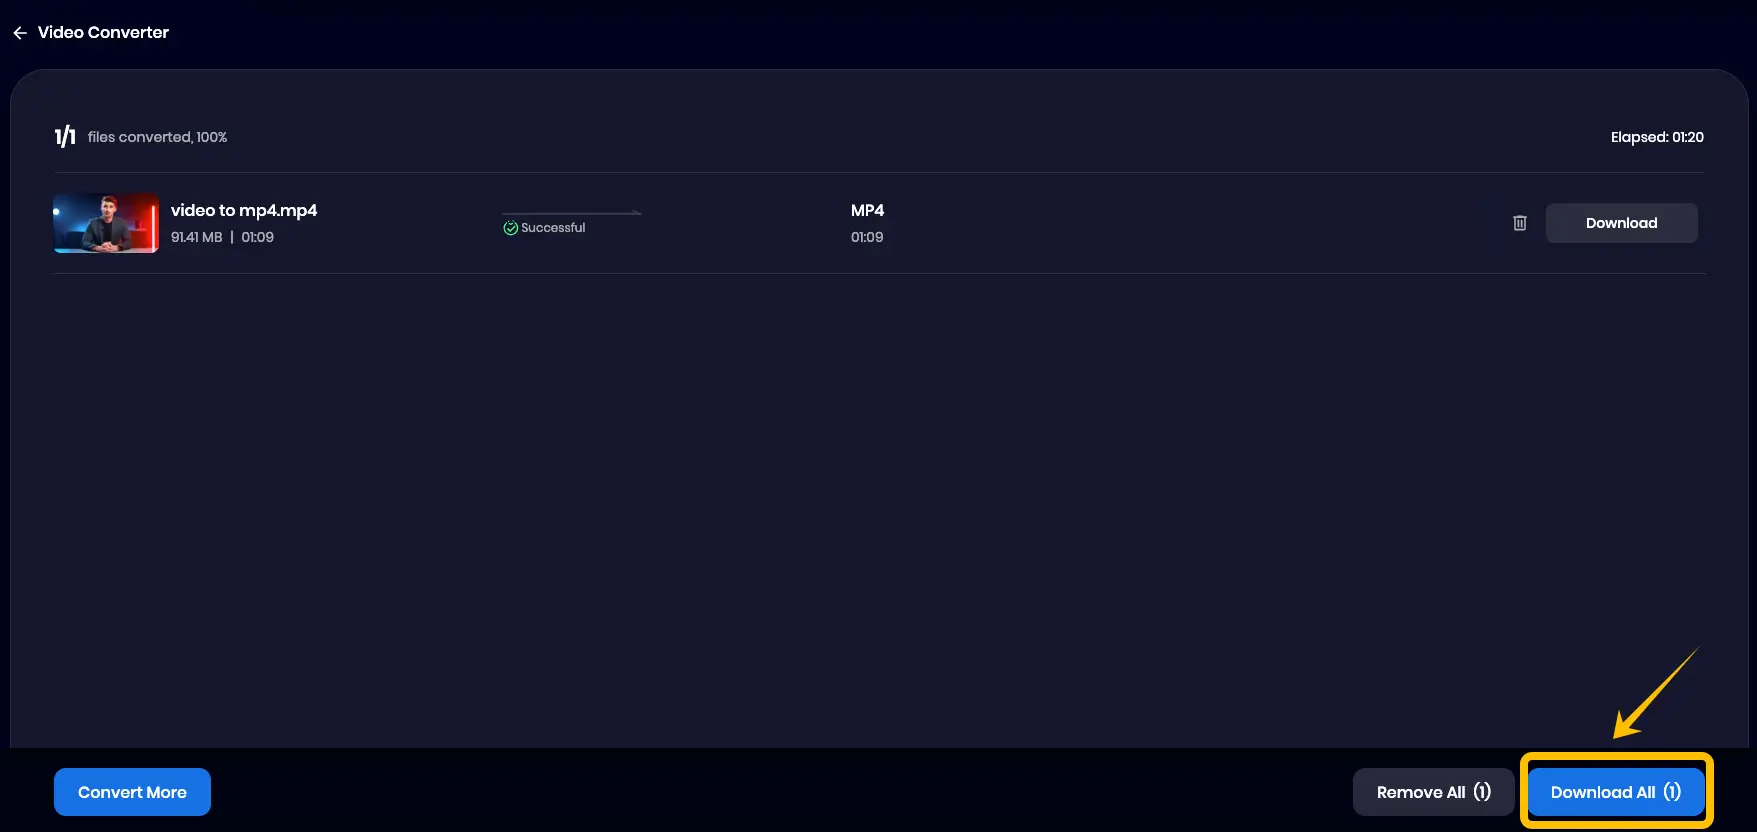
Convert and Download All: Once your files are ready, click Convert All. After the processing is complete, simply click Download All to save all your new MP4 files in one go.
FAQ About Converting Video to MP4
Will the video quality decrease after conversion?
This depends on your settings. If you select the same resolution and a high bitrate as the original video, the quality loss is almost invisible to the naked eye. Tools like Snappixify use intelligent encoding to balance file size and visual quality perfectly.
How to convert video to MP4 on Mac?
You can use an online tool like Snappixify, which works on all operating systems including macOS. Simply open Safari or Chrome, upload your file, and download the MP4. No specific Mac software is required.
Is there a file size limit?
Most online tools have limits for free users. However, Snappixify typically offers a more generous allowance than its competitors, making it suitable for processing everyday short videos and social media clips.


